
Day 8
It is time to move on. I would love to loot the Lair again, but we have wasted a couple of days here with no benefits, so I am going to head north to the Ledges and see what's up there. The nice thing is that the Amazon gets a free MOVE, and with the Cloak of Mist, I also get a free HIDE, so I have six possible phases to burn each day. I record five MOVES and a HIDE to get me to the Ledges. Here is my path:

We move up there, but fail our HIDE again, so we are exposed as we reveal the chits...

Day 9
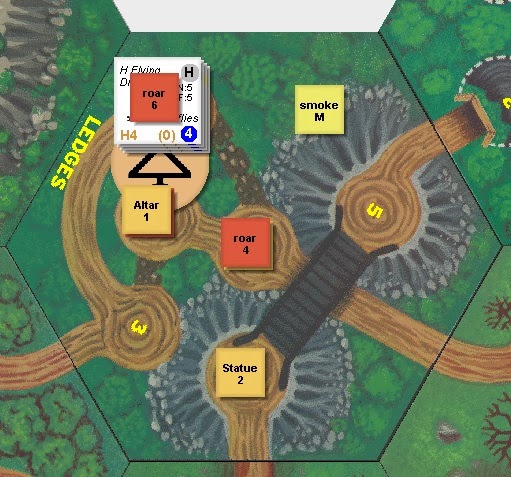
Hmm... there is a lot going on in this tile. Some of which won't be apparent in the picture above. First thing is, we found the Lost Castle in clearing 1 (the red chit is hidden under the Altar). All tiles with six clearings get a yellow warning chit and a red sound or a gold treasure site chit (these are randomly mixed when you setup the game). Two of the red sound chits are the Lost Castle and Lost City chits. Those are special because when you turn one of those up, you actually put five red/gold chits on the tile. This makes these tiles very dangerous and possibly very lucrative.
In this case, you can see two ROAR chits in clearing 4 and 6. Those are bad, because all they can do is draw monsters to the tile. However, there are also three gold treasure sites on the tile. The Altar in 1, the Shrine in 4 and the Statue in 2.
Both the Altar and the Shrine have 4 treasures. The Altar has 4 large treasures which makes it pretty nice. All three of these sites have spells the characters can learn. Unfortunately, that doesn't do the magic-illiterate Amazon any good.
Statistically, the Lair is a better bet for the Amazon. There are only two chits that can summon monsters, and there are 4 treasures left in the Lair, which matches the best sites here. However, since we are here, and would like to get our hands on some of the large treasures in the Altar, we are going to spend a day or two here and see how it goes.
So, I am record HIDE, HIDE, MOVE, MOVE, SEARCH, SEARCH and try my luck.

You can see that the day is a mixed bag. I missed the first HIDE, but made the second and thus avoided one hungry giant. Once I got to the clearing with the Altar, I failed to locate the treasure site. Fortunately, the monster roll today is a "3" and nothing is roaming in this tile. Luck has granted us another day to search. It is still a little disconcerting, desperately searching for treasure with Tremendous Giants prowling on either side, just waiting for the chance to smash us with their massive clubs.
Day 10
I record HIDE, SEARCH, SEARCH, SEARCH, SEARCH. I want to get the extra SEARCH in today. Ideally, I hide, find the Altar on an early roll and can loot the remainder of my phases.


The Girdle is interesting because it allows me to play 3 effort asterisks each combat round. Each MOVE or FIGHT chit has a strength, a speed and a number of effort asterisks. So, you can see on the Amazon's card that I have chits like MOVE M4 and FIGHT M3**. Typically, the heavier and faster the chit, the better, and the better chits usually take more effort.
Each round of battle, you generally play a MOVE chit to defend against your opponent's attack, and a FIGHT chit to attack. You may also have played a MOVE or FIGHT earlier in the round to perform actions like readying a weapon, or trying to flee combat. In a single round, you are usually only permitted to play a total of 2 effort asterisks. The Girdle allows me to play up to 3, which gives me a little bit more flexibility in a fight.
Ok, explanation's over. Let me end my turn and see what disaster awaits the unhidden Amazon!

Well, the monster roll is a "1", and I am in a tile with a SMOKE M chit and so you can see in the far upper-left of the setup card, I am going to pull 2 Heavy Flying Dragons.

Unfortunately, I cannot kill these guys with my current weapon because they are heavy and armored and the best I can do is M* damage -- remember the armored creatures cancel a sharpness star and so, that leaves me with medium damage. Still, they can't catch me, so I can flee, but that is going to leave me in a really crappy position...

My running from the clearing has left me in between a Giant and the Dragons. Remember that because I am between clearings, I have to record a MOVE as my first phase, which will put me in reach of one of these two monsters. Unfortunately, as soon as I end my MOVE phase unhidden in a clearing with a monster, I will be blocked and my turn will end, forcing me into a combat I cannot win. I will then have to flee and because I just entered the clearing that day, I will have to go back the way I came, putting me between two monsters...
I am stuck.
There is a modicum of hope. If the monster roll comes up either on a "1" or "4", some of these creatures will be "prowling" which will draw them into the clearing with me and that will clear a path to escape.
Which highlights the fact that staying in this tile with the Amazon and her starting weapon was a pretty bad idea. The high number of chits on the tile almost guaranteed I would run into a bunch of creatures I could not handle and the placement of the chits on the tile meant that my current predicament was predictable. At its core, Magic Realm is about risk management. You have to minimize the worst possible outcome of the dice, because that is the most likely outcome! It is very much a game of balancing risk versus reward and in this case, the odds were much better heading back to the Lair, or exploring somewhere else.
Or heck, at least recording two HIDE phases instead of one. In this case, had I hidden twice, like I did trying to get to this clearing, I might have saved myself. Instead, the Amazon is in for a clunky few days of fleeing and hoping for a favorable monster roll.
Day 14
Finally, we get the break we need. The dragons and giants have all lined up in a single clearing, allowing the Amazon to escape.
So, I am off to the Altar again and I will have to make some tough decisions about how to navigate the Ledges next week.
No comments:
Post a Comment